
A fohawk, also known as a faux hawk, is a trendy hairstyle that has been around for decades. This hairstyle is perfect for those who want to stand out from the crowd and express their individuality. The fohawk is a versatile hairstyle that can be styled in several different ways, depending on your personal preference. In this article, we will discuss how to style a fohawk and provide tips for keeping your hair looking its best.
Step 1: Start with Clean Hair

The first step in styling a fohawk is to start with clean hair. Use a high-quality shampoo and conditioner to ensure that your hair is clean and healthy. Avoid using too much conditioner, as this can weigh down your hair and make it difficult to style.
Step 2: Blow Dry Your Hair

Next, use a blow dryer to dry your hair. Use a medium heat setting and a round brush to create volume and texture in your hair. Pay special attention to the top of your head, as this is where the fohawk will be styled.
Step 3: Apply Product

Apply a small amount of hair product to your hair. Use a high-quality hair gel or wax to create a strong hold that will last all day. Work the product through your hair, starting at the roots and working your way up to the tips.
Step 4: Create the Fohawk

To create the fohawk, use a comb to pull the hair on the top of your head upwards. Use your fingers to shape the hair into a point, creating the signature "mohawk" look. Use a small amount of product to hold the hair in place, and use a comb or your fingers to smooth out any bumps or flyaways.
Step 5: Finish with Hairspray

Finally, finish your fohawk with a light mist of hairspray. This will help to hold the hair in place and prevent it from falling flat throughout the day. Use a high-quality hairspray that won't leave your hair feeling sticky or crunchy.
Tips for Maintaining Your Fohawk

Now that you know how to style a fohawk, here are some tips for keeping your hair looking its best:
- Trim your hair regularly to maintain the shape of your fohawk.
- Avoid using too much product, as this can weigh down your hair and make it difficult to style.
- Use a high-quality shampoo and conditioner to keep your hair healthy and strong.
- Avoid washing your hair too often, as this can strip your hair of its natural oils and make it dry and brittle.
- Consider using a deep conditioning treatment once a week to keep your hair soft and moisturized.
Conclusion
Styling a fohawk may seem intimidating at first, but with a little practice, you can create a trendy and unique hairstyle that will turn heads wherever you go. Remember to start with clean hair, use the right products, and finish with hairspray to keep your hair looking its best all day long. With these tips and tricks, you'll be able to rock a fohawk like a pro in no time!
Related video of How To Style A Fohawk
There’s nothing better than enjoying a hot cup of tea with a dollop of honey to sweeten up your day. But, what do you do when you have a jar of honey that you can’t finish or want to store for a long time? In this article, we’ll teach you how to store honey properly to keep it fresh and delicious for months to come.
Why is it important to store honey correctly?
/90108410-56a497c95f9b58b7d0d7b977.jpg)
Before we dive into the nitty-gritty of storing honey, it’s important to understand why it’s crucial to store it correctly. Honey is a natural food that is rich in nutrients and antioxidants. However, it is also a hygroscopic substance, which means it easily absorbs moisture from the air. If honey is not stored properly, it can lose its flavor, aroma, and texture, and even spoil or crystallize.
What is the best way to store honey?

The best way to store honey is in a cool, dry, and dark place. Ideally, you should store honey in a glass jar with a tight-fitting lid. Glass is non-porous and won’t react with honey, while plastic containers can absorb odors and flavors from other foods. A tightly sealed lid prevents moisture and air from getting into the jar, which can cause honey to ferment or crystallize.
How to prevent honey from crystallizing

Crystallization is a natural process that occurs when glucose molecules in honey form into crystals. Crystallized honey is safe to eat and can be easily liquefied by heating it in a warm water bath. However, many people prefer liquid honey for its convenience and texture. To prevent honey from crystallizing, store it at room temperature and avoid exposing it to extreme heat or cold. You can also add a teaspoon of lemon juice or vinegar to honey to prevent it from crystallizing.
Can you store honey in the fridge?

You can store honey in the fridge, but it’s not necessary. Honey can last for years if stored properly at room temperature. Storing honey in the fridge can cause it to crystallize and become firmer in texture, which can be difficult to spoon out. However, if you live in a hot and humid climate, storing honey in the fridge can help to slow down the crystallization process.
How long can you store honey?

Honey is one of the few foods that doesn’t spoil. If stored properly, honey can last for years without going bad. However, over time, honey can change in color, flavor, and texture due to natural processes. The flavor of honey can also be affected by the type of flowers the bees used to make it. To ensure the best quality, it’s recommended to use honey within 2 years of purchase.
Conclusion
Storing honey correctly is essential to keep it fresh and delicious for a long time. Remember to store honey in a cool, dry, and dark place, in a glass jar with a tight-fitting lid. Avoid exposing honey to extreme temperatures and use it within 2 years of purchase for the best quality. By following these simple tips, you can enjoy the natural sweetness of honey in your tea, baking, and cooking for months to come.
Related video of How To Store Honey

Introduction
Mosquito bites can be irritating and uncomfortable. They can also be dangerous if the mosquito is carrying a disease. The good news is that you can stop mosquito bites from itching with a simple household item - a spoon.Why Do Mosquito Bites Itch?
When a mosquito bites you, it injects saliva into your skin to keep your blood flowing. This saliva contains proteins that your body reacts to, causing an itchy bump to form.How Does A Spoon Help?
A spoon can help to relieve the itch of a mosquito bite by applying pressure to the affected area. This pressure helps to break up the proteins in the mosquito saliva, reducing the itch.
How To Use A Spoon To Stop Mosquito Bites From Itching
To use a spoon to stop mosquito bites from itching, follow these steps:1. Wash the affected area with soap and water.2. Place the back of a spoon in hot water for a few minutes.3. Remove the spoon from the water and let it cool down for a few seconds.4. Press the back of the spoon onto the mosquito bite for a few minutes, applying gentle pressure.5. Repeat as necessary until the itch is relieved.Other Ways To Stop Mosquito Bites From Itching
If you don't have a spoon handy, there are other ways to stop mosquito bites from itching, including:- Applying a cold compress to the affected area.- Rubbing the bite with an ice cube.- Applying a paste made of baking soda and water.- Using an over-the-counter anti-itch cream.How To Prevent Mosquito Bites
Preventing mosquito bites is the best way to avoid the discomfort and potential danger of mosquito-borne diseases. Here are some tips for preventing mosquito bites:- Use insect repellent containing DEET.- Wear long-sleeved shirts and pants when outdoors.- Avoid outdoor activities during peak mosquito hours (dawn and dusk).- Remove standing water from around your home to eliminate breeding grounds for mosquitoes.Conclusion
Mosquito bites can be a nuisance, but they don't have to ruin your day. By using a spoon or other remedies to relieve the itch, and taking steps to prevent mosquito bites in the first place, you can enjoy the outdoors without worrying about these pesky insects.Related video of How To Stop Mosquito Bites From Itching With A Spoon

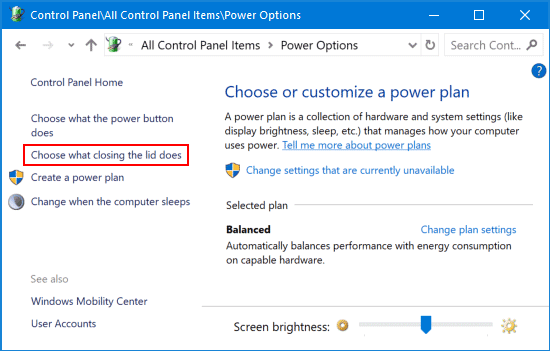
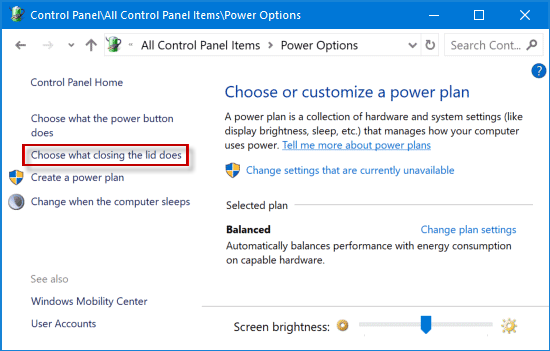
Computers are essential tools for work, entertainment, and communication. However, they can be frustrating when they keep shutting down unexpectedly. This can lead to data loss, productivity loss, and even hardware damage. If your computer is shutting down on its own, there are several things you can do to fix the problem. This article explains how to stop your computer from shutting down.
Check Power Settings

The first thing to check when your computer keeps shutting down is the power settings. Your computer may be set to shut down automatically after a certain period of inactivity. To check and adjust the power settings, follow these steps:
- Click the Start button in the bottom-left corner of your screen.
- Select Settings.
- Click System.
- Select Power & Sleep.
- Adjust the settings to your preference.
-Step-8-Version-2.jpg)
If your computer is a laptop, make sure the battery settings are also configured correctly. You can access the battery settings by clicking the battery icon in the system tray.
Check for Overheating

Another common reason for computer shutdowns is overheating. When the internal components of your computer get too hot, the system may shut down to prevent damage. To check for overheating, you can use software like CPU-Z or HWMonitor. These programs can monitor your computer's temperature and help you identify the source of the problem.

If you find that your computer is overheating, there are several things you can do to fix the problem. You can clean the dust from your computer's fans and vents, replace the thermal paste on your CPU, or install additional cooling fans.
Check for Malware
-Step-3-Version-2.jpg/aid479000-v4-728px-Stop-Your-XP-Computer-from-Hibernating-(Shutting-Down)-Step-3-Version-2.jpg)
Malware can also cause your computer to shut down unexpectedly. Malware is a type of software that is designed to harm your computer or steal your personal information. To check for malware, you should run a full system scan with a reliable antivirus program. You can also use anti-malware software like Malwarebytes to scan your system for threats.

If you find malware on your computer, you should remove it immediately. You can use the antivirus or anti-malware program to remove the threat, or you can seek help from a professional computer technician.
Check for Hardware Issues
If none of the above solutions work, there may be a hardware issue causing your computer to shut down. Common hardware issues include faulty power supplies, malfunctioning RAM, or a failing hard drive. If you suspect a hardware issue, it's best to seek help from a professional computer technician. They can diagnose and repair the problem, and prevent further damage to your system.
Conclusion
Computer shutdowns can be frustrating and disruptive, but they are usually fixable. By checking power settings, monitoring for overheating, scanning for malware, and diagnosing hardware issues, you can stop your computer from shutting down unexpectedly. Remember to take good care of your computer, and seek help from a professional if needed.
Related video of How To Stop Computer From Shutting Down

Windows 8 is a widely used operating system that comes with many features that make it user-friendly. One of the features that people often struggle with is automatic updates. While updates are vital for the security and performance of your computer, they can sometimes be inconvenient, especially when they happen at the wrong time. In this article, we will guide you on how to stop auto-update in Windows 8.
Why You May Want To Stop Auto Update In Windows 8

There are several reasons why you may want to stop auto-update in Windows 8. Firstly, automatic updates can be disruptive, especially if you are in the middle of an important task. Secondly, updates can consume a lot of internet bandwidth, which can be a problem if you have limited data. Lastly, some updates may cause compatibility issues with your installed software, leading to crashes and other problems.
How To Turn Off Automatic Updates In Windows 8
To stop auto-update in Windows 8, follow these simple steps:
- Press the Windows key + R to open the Run dialog box.
- Type "services.msc" and click OK.
- Scroll down to find the "Windows Update" service.
- Double-click on it to open the Properties dialog box.
- Click on the "Stop" button to stop the service.
- Under "Startup type", select "Disabled" from the drop-down menu.
- Click on "Apply" and then "OK" to save the changes.
After following these steps, Windows will no longer download or install updates automatically. You will need to manually check for updates and install them.
How To Disable Automatic Driver Updates In Windows 8

Windows 8 also has a feature that automatically updates drivers. While this feature can be useful, it can also cause compatibility issues with your hardware. To disable automatic driver updates, follow these steps:
- Press the Windows key + X and select "System" from the menu.
- Click on "Advanced system settings".
- Select the "Hardware" tab and click on "Device Installation Settings".
- Choose "No (your device might not work as expected)" and click on "Save Changes".
After following these steps, Windows will no longer automatically update your drivers. You will need to manually update them.
How To Check For Updates Manually In Windows 8
If you have disabled automatic updates, you will need to check for updates manually. To do this, follow these steps:
- Press the Windows key + I to open the Settings charm.
- Click on "Change PC settings".
- Select "Update and recovery".
- Click on "Check now" under "Windows Update".
- Windows will now check for updates. If there are any updates available, click on "Install Updates".
By following these steps, you can check for updates manually and install them at your convenience.
Conclusion
Stopping auto-update in Windows 8 can be useful for several reasons, including avoiding disruptions and compatibility issues. By following the steps outlined in this article, you can easily turn off automatic updates and check for updates manually.
Related video of How To Stop Auto Update In Windows 8

Consciousness is a state of being aware of your surroundings, thoughts, and emotions. It is the ability to be present in the moment and make conscious decisions. However, many of us struggle to stay conscious in our day-to-day lives. We get caught up in our thoughts and emotions, and we forget to be present. In this article, we will discuss some tips on how to stay conscious and improve your quality of life.
1. Practice Mindfulness

Mindfulness is the practice of being present and aware of your thoughts, feelings, and surroundings. It is a way to train your mind to focus on the present moment. You can practice mindfulness by meditating, focusing on your breath, or simply being aware of your surroundings.
2. Be Grateful

Gratitude is the practice of being thankful for what you have. It is a way to shift your focus from what you don't have to what you do have. When you practice gratitude, you become more aware of the good things in your life, and you feel more positive and happy.
3. Stay Present

Staying present means being aware of your surroundings and focusing on the present moment. It means not getting caught up in your thoughts or worries about the future. To stay present, you can practice mindfulness, focus on your breath, or simply tune in to your senses.
4. Get Enough Sleep

Sleep is essential for staying conscious and alert. When you don't get enough sleep, your mind and body become tired, and you are more likely to get caught up in your thoughts and emotions. Aim to get at least 7-8 hours of sleep each night to stay conscious and alert.
5. Eat a Healthy Diet

Eating a healthy diet is essential for staying conscious and alert. When you eat junk food or processed foods, your body becomes sluggish and tired. Aim to eat a balanced diet that includes fruits, vegetables, whole grains, and lean protein to stay conscious and alert.
6. Exercise Regularly

Exercise is essential for staying conscious and alert. When you exercise, your body releases endorphins that help boost your mood and energy levels. Aim to exercise for at least 30 minutes each day to stay conscious and alert.
7. Take Breaks

It's important to take breaks throughout the day to stay conscious and alert. When you work for long periods without taking a break, your mind and body become tired, and you are more likely to get caught up in your thoughts and emotions. Aim to take a 10-15 minute break every hour to stay conscious and alert.
8. Practice Self-Care

Self-care is essential for staying conscious and alert. When you take care of yourself, you are more likely to feel positive and happy. Self-care can include things like taking a bubble bath, reading a book, or spending time with loved ones.
9. Connect with Nature

Connecting with nature is essential for staying conscious and alert. When you spend time in nature, you become more aware of your surroundings and you feel more connected to the world around you. Aim to spend time in nature each day to stay conscious and alert.
10. Practice Gratitude Journaling

Gratitude journaling is the practice of writing down things you are grateful for each day. When you practice gratitude journaling, you become more aware of the good things in your life, and you feel more positive and happy. Aim to write down at least three things you are grateful for each day to stay conscious and alert.
Conclusion
Staying conscious is essential for living a happy and fulfilling life. By practicing mindfulness, gratitude, and self-care, and by taking care of your physical health, you can stay conscious and alert and enjoy all that life has to offer.
Related video of How To Stay Conscious

Introduction
Spelling is an important part of communication, and misspelling a word can change the meaning of a sentence. One word that is commonly misspelled is 'referred'. In this article, we will discuss the correct spelling of 'referred' and provide tips to remember how to spell it correctly.
The Correct Spelling
The correct spelling of 'referred' is R-E-F-E-R-R-E-D. It is spelled with two R's and two E's.

Tips to Remember the Spelling
Here are some tips to help you remember how to spell 'referred' correctly:
1. Break It Down
Break the word down into syllables: re-ferred. This can help you remember the two R's and two E's in the word.

2. Think of a Referral
Think of the word 'referral', which is similar in meaning to 'referred'. This can help you remember the two R's in the word.

3. Use Online Resources
Use online resources such as spell checkers and dictionaries to help you check the spelling of 'referred' and other words.
Common Misspellings
Here are some common misspellings of 'referred' that you should avoid:
1. Reffered
This misspelling is caused by confusion over the number of R's in the word. Remember that 'referred' has two R's.

2. Refereed
This misspelling is caused by confusion over the placement of the E's in the word. Remember that 'referred' has two E's, and they come after the two R's.
3. Refered
This misspelling is caused by leaving out one of the R's in the word. Remember that 'referred' has two R's.

Conclusion
Spelling 'referred' correctly is important for effective communication. Remember to use the tips provided in this article to help you remember the correct spelling. If you are unsure about the spelling of a word, use online resources to check it. With practice, you will become more confident in your spelling abilities.
Related video of How To Spell Referred

“Mamma” is a word that is often used to refer to a mother or a mother figure. The spelling of this word may seem simple, but it can be confusing for some. In this article, we will discuss the correct spelling of “mamma” and provide some tips on how to use it correctly in your writing and conversation.
Spelling of “Mamma”

The correct spelling of “mamma” is with two “m’s” and two “a’s” – M-A-M-M-A. This spelling is used in most English-speaking countries, including the United States, the United Kingdom, and Australia.
It is important to note that there are other variations of the spelling of “mamma” that are used in different parts of the world. For example, in some European countries, such as Italy and Spain, the word is spelled “mama” with only one “m”. In some African countries, the word is spelled “mama” with one “m” and one “a”.
Using “Mamma” in Writing

If you are using the word “mamma” in your writing, it is important to use the correct spelling. This not only ensures that your writing is grammatically correct but also helps to avoid confusion among your readers.
When using “mamma” in your writing, it is best to use it in a context that is appropriate. For example, you can use “mamma” as a term of endearment to refer to your mother or a mother figure. You can also use “mamma” to refer to a female animal that is a mother, such as a “mamma bear” or a “mamma cat”.
Using “Mamma” in Conversation

When using “mamma” in conversation, it is important to use it in a context that is appropriate. For example, you can use “mamma” to refer to your mother or a mother figure in a casual conversation. You can also use “mamma” as a term of endearment for someone you are close to, such as a significant other or a close friend.
It is important to note that the use of “mamma” in conversation can vary depending on the culture and region. For example, in some cultures, it may be more common to use “mum” or “mom” instead of “mamma”.
Common Misspellings of “Mamma”

Despite the simple spelling of “mamma”, it is not uncommon for people to misspell it. Some common misspellings of “mamma” include “mama”, “momma”, and “mom”.
To avoid misspelling “mamma”, it is important to remember the correct spelling and to double-check your spelling when using the word in your writing or conversation.
Conclusion
“Mamma” is a word that is commonly used to refer to a mother or a mother figure. While the spelling of this word is simple, it is important to use the correct spelling to ensure that your writing and conversation are grammatically correct and clear. Remember, the correct spelling of “mamma” is M-A-M-M-A.